
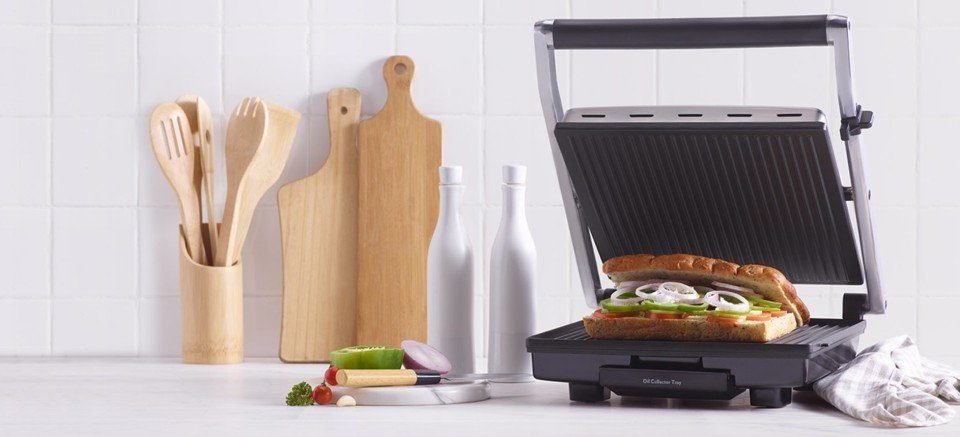
A quick breakfast is always welcome especially in the morning when you are in a hurry for your office. One such kitchen appliance that comes to the rescue is breakfast sandwich maker. But have you ever wondered how to use sandwich maker? and how to clean sandwich maker? Even though this question seems silly for some, this is the most common question for many which comes first in their mind.
The sandwich maker is best kitchen appliance for preparing your breakfast, morning or evening, it doesn’t matter, you can prepare tasty sandwiches in no time. The best part of sandwich makers is that you can cook restaurant style sandwiches in no time.
Is there anything I should do before I use my sandwich maker for the first time?
Before the first use you should lightly brush the surface of the plates with cooking oil. Don’t use low fat spreads as they may burn and damage the non-stick surface. Heat the unit with the lid open for 5 minutes. Unplug and allow to cool, then remove any excess oil with absorbent paper.
Sandwich maker is the best breakfast maker kitchen appliance which helps you prepare different types of sandwiches with ease. The traditional way of preparing sandwiches that too on your cookware sets is highly time consuming and involves lots of efforts to put up to get tasty sandwiches.
As preparing the best sandwiches is not easy task, cleaning sandwich maker is also not an easy task too. You must know how to clean your sandwich maker so that it can lasts longer. Cleaning sandwich maker becomes an easy task when you read clean your sandwich maker and increase its life.

Contents
- 1 How to use sandwich maker? [2023]
- 2 Features of sandwich maker
- 3 How to operate sandwich maker?
- 4 How to clean sandwich maker?
- 5 Precautions to use sandwich maker
- 6 Safety instructions of sandwich maker
- 7 Troubleshooting for sandwich maker
- 8 How to use sandwich maker for the first time?
- 9 How to clean Philips sandwich maker?
- 10 How to store Philips sandwich maker?
- 11 How to use Usha sandwich maker?
- 12 Conclusion
How to use sandwich maker? [2023]
For many still using sandwich maker is a new thing. The irony is that the hardly anyone knows usage of sandwich maker as the technology of sandwich maker has been introduced to the world just few years back. Believe us or not, still many use and prefer the traditional way of preparing sandwiches than using a sandwich maker.
As this becomes a whole new topic for such people, we at the modern kitchen ideas will help you find the solution for that. Today in this post we will take you through how to use your sandwich maker step-by-step to prepare yummy sandwiches for your breakfast.
How to use sandwich maker? or How to use breakfast sandwich maker?
The best way to use any sandwich maker is to read the user manual which has come along with your sandwich maker. The reason is very simple, different sandwich makers have their own ways of usage of sandwich maker. But at the end of the day, the usage of breakfast sandwich maker follows the following instructions.
Here are 10 steps to use sandwich maker:
- Unbox and clean it
- Plug in
- Prepare your cheese sandwich
- Open sandwich maker
- Place your stuffed sandwich
- Close it
- Wait until your sandwich is prepared
- Remove sandwiches
- Un-plug in
- Cool it and wipe it
1. Unbox and clean it
The first and foremost thing you must do before you start using your sandwich maker is to unbox it and just clean the surface off with the help of dry soft cloth.
A basic wipe cleaning of sandwich maker before its use will ensure you of safety and clean food cooking. Make sure that all the stickers on the sandwich maker are removed off completely. Keep in mind the sandwich maker and its parts should be dried out before their usage.
Check for any physical damages or any other kind of damages before its usage. If you find any damages, please return to the vendor from where you brought and ask for replacement.
2. Plug in
The next part is to plug in the sandwich maker to the power socket. To do that, take your sandwich maker and plug it into any power socket of your kitchen. Allow it to heat up for some time as indicated in the manual.
In general, many sandwich makers come with a light indicator which helps you know that its ready for cooking and is properly heated up. The heating process could take from 30 secs to 1 min. However, before switching on the sandwich maker make sure that your home’s main voltage corresponds to the sandwich makers operating voltage.
3. Prepare your cheese sandwich
To get started, you can try veg cheese sandwich. For this you can take 2 bread slices and apply butter on one side of bread on each of the bread slice. Then you can apply sauces of your choice on the side where you have applied butter.
Uniformly place the sliced vegetables such as onions, cucumber, boiled potato, tomatoes, and green lettuce. Sprinkle black pepper powder, salt and chat masala. Now add slices of cheese on them and close the other bread slice.
4. Open sandwich maker
Once you are ready with your stuffed sandwich, now it’s time to open your sandwich maker. Most of the sandwich makers come with a button to open which you need to press it, which automatically opens up the sandwich maker.
Whereas few of them have a hook, clamp, lock or pin you need to open manually by holding with your fingers and move them to the top to open the sandwich maker.
5. Place your stuffed sandwich
Now it’s time to place the stuffed sandwich into the sandwich maker on top of the bottom plates. Some sandwich makers will have 1 or 2 or 4 sliced plates which allows you to keep 1 or 2 or 4 stuffed sandwiches accordingly.
Make sure that you ensure of your safety by not touching the plates with bare hands as they will be in hot condition and could burn your fingers or hand too.
6. Close it
Once you have properly placed the stuffed bread slices, now it’s time to close the sandwich maker.
To do so, you can hold the hook or clamp from the top plate and bring it down until it closes. Additionally, you may need to close the clamp or hook tightly by pressing it to have proper locking of sandwich maker. Thanks to the lock feature or child safety feature that some sandwich makers offer.
7. Wait until your sandwich is prepared
Once closed, the sandwich maker will starts preparing the sandwich. Usually, the sandwich cooking will take place up to 2 to 3 min’s. Wait until the indicator lightens up.
Most of the sandwich makers houses a green light which will light up once the sandwich is prepared. Now it’s time to open the lid of sandwich maker. For that hold and press the lock or button which will automatically open-up the sandwich maker top plate allowing you to remove the sandwiches.
8. Remove sandwiches
As said once the sandwiches are ready, it’s time to remove them from sandwiches. You can make use of a wooden or silicone spatula to take out the sandwiches.
9. Un-plug in
Now you are having your sandwiches for your breakfast, it’s time to un-plug the sandwich maker. For that you can use your hands and un-plug the cable from the power socket.
Make sure that your hands are not wet while un-plugging your sandwich maker or else you might get shocked.
10. Cool it and wipe it
Once you have un-plugged your sandwich maker, now allow it to cool for 5 to 10 min’s with its top plate open or in an open condition. This will remove the heat inside the sandwich maker and ensures you from any unsafe hazards which might occur.
Once it gets cool down, now wipe out the top and bottom plates of sandwich maker with the help of soft slightly wet sponge or a slightly damp microfiber cloth. Allow it to dry out so that all the moisture is removed from the sandwich maker. Now you can close the lid or top plate and place your sandwich maker at a safe and proper storage location.
Features of sandwich maker
There are plenty of features that the sandwich makers come with. However, there are few of the basic features of sandwich grill maker. Here are few of them:
- Non-toxic ceramic coating for healthy cooking
- Multi-functional grill, toaster and sandwich maker
- Ergonomic handle with automatic temperature cut-off
- Easy to use, clean and store
- Cool-touch handgrips
- Locking Tab
- Red Power-on light
- Green heating-up light
- Cool touch surface
- Perfect cooking plates
- Cord storage facility
- On/Off switch
How to operate sandwich maker?
When it comes to using a sandwich maker you must understand how to operate a sandwich maker. Operating a sandwich maker involves few of the steps.
Here we have listed down such steps which you must need to follow the following steps:
- Clean all the parts of sandwich maker before you use
- Plug the sandwich maker and allow it to pre-heat for 2 to 3 minutes. When it will be in condition of pre-heat the LED light will be in on condition. Once it gets heated up and ready, the light will turn off
- Open the sandwich maker by opening the top plate and spray or apply a small amount of oil on top and bottom plates of sandwich maker
- Place the stuffed bread with your loved ingredients on bottom plate
- Close the lid, lock it and allow it to auto cook for 2 to 4 minutes until the light turns off. The breads now are golden brown; this means they are completely cooked
- Now open the lid of sandwich maker and take out the sandwiches
- Now un-plug it, let it cool down, clean it and store it properly
How to clean sandwich maker?
Cleaning and maintenance of your sandwich maker is must so that you can keep your sandwich maker for a longer period of time. Cleaning and maintaining your sandwich maker will not only help your sandwich maker to live longer but also keeps it ready for next usage.
Follow below steps to clean and maintain your sandwich maker sick and clean all the time:
- Switch off the sandwich maker and unplug the sandwich maker before cleaning it
- Wipe the sandwich maker with the help of slightly damp cloth or a microfiber cloth along with non-abrasive liquid cleaner
- Never ever immerse the sandwich maker in to the water or any liquid completely
- Once you clean it completely, wipe the sandwich maker with the help of dry soft microfiber cloth
- Allow the sandwich maker to get dry before its next use
Precautions to use sandwich maker
Having and using a sandwich maker is not just an easy job. While you use a sandwich maker you must take precautions in order to keep your sandwich maker safe and also to take care of your safety too.
Here are few of the precautions you must take in order to ensure safe usage of sandwich maker:
- Never immerse or clean your sandwich maker or plug or cord completely or partially with water as they can damage the sandwich maker or even cause short circuits or electric accidents
- Try not to disassemble, repair or alter the appliance on your own as it can cause appliance breakdown or failure of your appliance
- Make sure that the input voltage of your home must not exceed the operating voltage of your sandwich maker as it might damage the appliance
- Never clean the sandwich maker when it’s in plugged-in condition
- Never ever use the sandwich maker with damaged power cord or plug
- Never ever keep the sandwich maker near any heat source such as a heater
- If you are not using your sandwich maker for a longer time, make sure that it is kept in an un-plugged condition
- Never ever use the sandwich maker in an inclined position
- Always connect the sandwich maker to an earthed wall socket
- Do not let the mains cord hang over the edge of the table or worktop on which the sandwich maker stands
- Try not to touch the accessible surfaces as the temperature of accessible surfaces may be high when the appliance operates
- Keep in mind that you should never use metal tongs, sharp edge items, sharp items, abrasive items or a knife as these can damage to the ceramic coating of sandwich maker.
- Most of the sandwich makers are intended for household use only
Safety instructions of sandwich maker
Whenever you are using any electric appliance no matter whether its sandwich maker or any other, you must take and ensure all applicable safety precautions. Hence, we have listed down all such safety instructions here so that you can use your sandwich maker without any concerns.
Here are 11 safety instructions while use sandwich maker:
- Always unplug the sandwich maker when it’s not in use or before serving your sandwiches
- Once you have finished with your cooking, unplug the sandwich maker and allow it to cool down before you clean it and store it as you could get your hands burned
- Do not use near or on wet surfaces and always use it on dry surfaces so that you can reduce the risk of electric shock
- Always use your sandwich maker as prescribed in the manual
- Never use the sandwich maker if it’s cord or plug is damaged or worn out. Immediately replace them as soon as they get damaged
- Do not try to service the sandwich maker on your own
- Always keep the cord away from any of the heat sources or heated surfaces
- Never unplug your sandwich maker by pulling the cord. This means to unplug, pull the plug not the cord
- To avoid electric shocks, do not use the appliance with wet hands
- Keep hair, loose clothing, fingers or your body parts away from the heated surface of the sandwich maker
- Always keep your children away from the sandwich maker
Troubleshooting for sandwich maker
The below table guides you through troubleshooting your sandwich maker when you are using it. But remember that you must refer the user manual as different sandwich makes will be having different troubleshooting guides. However, the listed ones here are almost similar to any sandwich makers.
Here are few guides for sandwich maker troubleshooting:
The sandwich maker does not start
There is a connection problem
Check if the sandwich maker is connected to the mains and if the plug is inserted firmly in to the wall socket
The sandwich maker is defective
Switch off the sandwich maker and unplug it. Go to the nearest authorized service center of your sandwich maker brand for assistance
The sandwich maker suddenly stops working while running
The sandwich maker has overheated
Allow the sandwich maker to cool down for 20 to 30 minutes before attempting to restart it again
The sandwich maker is defective
Switch off the sandwich maker and unplug it. Go to the nearest authorized service center of your sandwich maker brand for assistance
How to use sandwich maker for the first time?
Before the first use of your sandwich maker, you should lightly brush or spray the surface of the plates with cooking oil. Don’t use low fat spreads as they may burn and damage the non-stick surface. Heat the unit with the lid open for 5 minutes. Unplug and allow to cool, then remove any excess oil with absorbent paper.
Before the first use you can follow the below steps:
The sandwich maker may give off some smoke or even sense burning smell when you use it for the first time. This is normal and get feared off.
- Read the Instructions carefully, especially the section “Important Precautions” or “Cautions” or “Precautions”
- Remove any stickers and wipe the body of the sandwich maker with a damp cloth
- Check that voltage indicated on the appliance (underside of the toaster) corresponds with the mains voltage
- Pull the locking tab upwards and open the sandwich maker
- Clean the cooking plates with a damp cloth or sponge
- This Appliance must be earthed. If an extension cord is required, it must be earthed too
How to make sandwiches while you use the Philips sandwich maker?
Who don’t love making sandwiches? But have you ever wondered how to make sandwiches on a sandwich maker? Well, below are the steps that you can follow to make your first sandwich from your all-new sandwich maker.
How to use Philips sandwich maker? – Making toasted sandwiches:
1. Lightly grease the cooking plates with a little butter or oil
2. To adjust the length of the cord, wind part of it round the cord storage facility
3. Put the mains plug in the wall socket and set the on/off switch
- The red power-on light goes on. This light stays on as long as the appliance is connected to the mains
- The green heating-up light goes on
- The green heating-up light goes out when the appliance is ready for use
4. Prepare the ingredients for the toasted sandwiches while the appliance is heating up
- For each sandwich, you need two slices of bread and a suitable filling
- Lightly butter the sides of the bread that come into contact with the cooking plates to obtain an even, golden brown result
- To ensure optimal sealing, do not spread fillings too close to the edges of the slices of bread
5. Open the sandwich maker
6. Put the sandwiches to be prepared on the lower cooking plate
- You can also toast only one sandwich, if you wish
7. To close the sandwich maker, lower the upper cooking plate carefully onto the bread until the locking tab locks the plates automatically
- During cooking, the green heating-up light goes on and off. This indicates that the heating elements are switched on and off to maintain the correct temperature
8. Open the sandwich maker after 3-4 minutes to check whether the sandwiches are golden brown
- The cooking time required to obtain crispy brown sandwiches depends on the type of bread, the filling and your personal taste
9. Remove the sandwiches
- Use a wooden or plastic utensil (e.g., a spatula) to remove the toasted sandwiches from the sandwich maker. Do not use metal, sharp or abrasive kitchen utensils
10. If you wish to continue making sandwiches, wait until the green heating-up light goes out before you put new sandwiches in the sandwich maker.
11. After use, set the on/off switch to ‘O’ and unplug the appliance
How to clean Philips sandwich maker?
Never use aggressive or abrasive cleaning agents and materials, as this damages the non-stick coating of the plates. Never immerse the appliance in water or any other liquid, nor rinse it under the tap.
- Switch off and unplug the appliance
- Let the appliance cool down properly in open position
- First remove excess oil from the plates with a piece of kitchen paper before you clean them
- Use a wooden or plastic spatula to remove sticky food residues (for example solidified cheese) from the cooking plates
- Clean the cooking plates with a moist soft cloth or sponge
- Clean the outside of the appliance with a moist cloth
How to store Philips sandwich maker?
Here are the steps to store the Philips sandwich maker:
- Wind the cord round the cord storage facility
- Store appliance in vertical or horizontal position
How to use breakfast sandwich maker step-by-step guide?
Here are 17 steps to how to use a breakfast sandwich maker:
- Check to ensure that the heating plates are clean and free from dust. If necessary, wipe with a damp cloth
- When using the sandwich maker for the first time, brush the heating plates with oil, butter or margarine
- Close the lid
- Plug appliance into a standard electrical outlet. Both the red power light and amber ready light will come on; unit will immediately begin heating
- Allow the appliance to pre-heat for approximately 5 minutes while preparing the sandwiches. The amber ready light will come on when unit has reached heating temperature
- Open sandwich maker; place a slice of bread on the bottom plate with the buttered side down. (For golden-toasted sandwiches, butter the outside of the bread.)
- Place filling onto the bread
- Place the second slice of bread atop the filling with the buttered side up. Carefully close the top of the sandwich maker. Do not force shut. Steam will be released between the plates. Caution should be taken to prevent hands from coming in contact with the steam.
- Secure the two halves of the sandwich maker with the latch.
- Toasting time should take approximately 3-5 minutes. Exact toasting time will be a matter of taste and will depend on type of bread and filling used. The amber ready light turns on and off as the unit cycles to maintain ideal heating temperature; this prevents overheating. Avoid opening the sandwich maker before toasting is completed, as this may cause the sandwich to toast poorly
- When the sandwiches are toasted to taste, remove the sandwich using a plastic or wooden spatula. Do not use metal tongs or knives, as this may damage the non-stick coating
- Keep the lids closed to preserve the heat until ready for the next sandwich
- After use, immediately unplug from the electrical outlet.
- If sandwiches are not to be consumed immediately, place the sandwiches on a paper napkin to absorb condensation
- To keep hot, place on a rack in an ovenproof dish and warm in the oven at about 200°-250°F. Sandwiches will keep for about 20 minutes and then begin to dry out
Important instructions to follow before you use Usha sandwich maker?
Here are some of the instructions to be followed to use Usha sandwich maker:
- Read all instructions before use
- This appliance is not advised to be used by anyone (including children) with reduced physical, sensory or mental capabilities or lack of experience and knowledge, unless properly guided about the use of the appliance in a safe manner by the person concerned for their safety. Cleaning and user maintenance shall not be made by children unless they are older than 8 and supervised
- Keep the appliance and its cord out of reach of children less than 8 years
- Always use the product on a at, stable, heat-resistant surface
- Do not use the product near water or other liquids
- The temperature of the accessible surfaces may be very high when the appliance is in use. Make sure not to touch these hot parts of the appliance
- Use the product in a well-ventilated area. Keep at least 4-6 inches of space on all sides of the product to allow adequate air circulation
- Do not place the product on or near a gas or electric burner, or inside or on top of a heated oven or other heat source
- Do not allow the product to touch curtains, wall coverings, clothing, dishtowels, or other flammable materials during its use
- Do not move the product while it is plugged in. Allow the product to thoroughly cool before handling it
- Do not use attachments not recommended for use with this product
- Do not place or drop the product into water or other liquids. If the product falls into water, immediately unplug it from the electrical outlet. Do not touch or reach into the water
- Do not leave the product unattended while it is in use. The appliance is not intended to be operated by means of an external timer or separate remote-control system
- Do not put any stress on the Power Cord where it connects to the product as the Power Cord could fray and break
- Do not plug or unplug the product into/from an electrical outlet with a wet hand
- Do not operate the product if it has a damaged Power Cord or Plug, is not working properly, has been dropped, damaged, or exposed to water or other liquids.
- If the supply cord is damaged, it must be replaced by the manufacturer or its service agent or a similarly qualified person in order to avoid a hazard
- This product is intended for indoor, non-industrial, non-commercial, household. Do not use the item outdoors or for any other purpose
- Do not allow the Power Cord to hang where it may be tripped over or pulled (e.g., over the edge of a table or counter).
- To avoid a circuit overload when using this product, do not operate another high-wattage product on the same electrical circuit
- A power supply cord is provided with this product. An extension cord is not recommended for use with this product, but if one must be used
- The marked electrical rating of the cord must be at least as high as that of the product
- Arrange the extension cord so that it does not hang where it can be tripped over or pulled unintentionally
How to use Usha sandwich maker?
Here are 12 steps to use Usha sandwich maker:
1. Before using this product for the first time, clean it as described in the “Cleaning the product” section
2. Press in the end of the Locking Latch nearest the Handle to unlock the product
3. Open the unit by pulling the Handle up
4. Close the Plates and turn the unit on by plugging it into a standard electrical outlet. Verify that the Power Indicator Light illuminates in orange
- WARNING: The Cooking Plates and metal surfaces of the unit will become extremely hot when in use. To avoid a burn hazard, wear heat resistant mitts or gloves and touch only the black portion of the Handle
5. After the unit preheats for approximately five minutes, the Ready Indicator Light will illuminate in green, indicating the product is ready for use
6. Use the Handle to lift the Upper Plate. Place food on the Lower Plate using wooden or plastic heat-resistant utensils
- CAUTION: Do not use metal utensils on this product, as they will scratch and damage the Plates non-stick coating
7. Use the Handle to lower and rest the Upper Plate on top of the food
Notes:
- The cooking time for different foods depends on the type and thickness of the foods
- Foods should be cooked thoroughly before consumption
8. When the food is cooked as desired, lift the Handle to open the Plates, then remove the food using the utensils. If more cooking will be done at this time, close the Plates to conserve heat
9. Repeat Steps 7-9 until all cooking is complete, reapplying cooking oil as necessary
10. Turn on the product by unplugging the Power Cord from the electrical outlet
11. When the unit has completely cooled, clean and dry it
12. Lock the unit in its closed position by pressing in the end of the Locking Latch farthest from the Handle
Conclusion
Using a sandwich maker is a no brainer the moment you used it for the first time. But for those who just wants to use the best sandwich maker, the question how to use sandwich maker is the one which always comes into their mind first.
It’s obvious that people don’t know how to use the sandwich maker as the sandwich maker technology is new to many people. Hope this step-by-step guide to use sandwich maker has solved all of your queries. With lots of research and analysis we have compiled this article just for you to use your sandwich maker with ease.
Using the sandwich maker for the first time may be difficult. But once you use it, it’s one of the easiest kitchen appliances to use that you could ever use for preparing your early morning breakfast. Sandwich maker is life savior when it comes to morning breakfast.

![How To Use Grill Sandwich Maker [2023] – Step-By-Step Complete Guide](https://www.themodernkitchenideas.com/wp-content/uploads/2022/11/how_to_use_grill_sandwich_maker-500x383.jpg)
![How To Keep Kitchen Clean [2022] | Kitchen Cleaning Tips](https://www.themodernkitchenideas.com/wp-content/uploads/2021/10/25_ways_to_keep_kitchen_clean-500x383.jpg)
[…] maker grill which makes this possible, which makes the sandwich in just 2 minutes. If you know how to use sandwich maker then we can guarantee that you can prepare some tasty sandwiches for your […]
[…] know exactly how to use a sandwich maker and having a best sandwich grill for your kitchen is all amazing as it is one of the best saviors […]
[…] Previous Next […]
[…] How To Use Sandwich Maker [2021] – Step-By-Step Complete Guide […]